From the Hands of the Makers

Over the course of fifty years, Leopold and Rudolf Blaschka, father and son, continually experimented with materials and methods that pushed the boundaries of glassworking. After his father’s death in 1895, Rudolf continued to refine glass formulations, experiment with pigments and varnishes, and create his own palette of colored glass enamels.
All images are from The Ware Collection of Blaschka Glass Models of Plants, Harvard University Herbaria / Harvard Museum of Natural History, and © President and Fellows of Harvard College unless otherwise noted.
Making the Glass Flowers
The Blaschkas used lampworking to make the models a technique in which glass tubes and rods are melted and softened in a flame and then manipulated into desired shapes. They worked on many models simultaneously and in batches, making similar parts, like stems, leaves, and petals, individually, and then subsequently assembled them into complete models.
This demonstration on a nineteenth-century wooden lampworking table at The Corning Museum of Glass shows how the Blaschkas made their models.
Assembly Process
Shaping with Wire
As depicted in this schematic drawing, the Blaschkas made a wire armature on which they strung together sections of glass tubing like beads. This structure supported projecting stems and leaves.

Stems, Leaves, and Flowers
Glass tubes were used to make stems (1), and leaves were formed from glass rods and attached to wires (2). The stems and leaves were then joined (3) and colored (4). Petals were pulled from glass rods (5), attached to wires, and then colored (6). The lower, tubular petal parts (corolla) and calyx were formed and colored (7), then strung on the wires to assemble the flower (8).

Delicate Details
Smaller parts, like the stamens and pistils of the flower in the Grumichama, Eugenia brasiliensis, were made separately and then attached with animal glue rendered from mammal hide. Raised surface details, like these leaf veins, were created with an organic material such as gelatin.

Nature's Textures
Replicating nature’s various textures presented the Blaschkas with the ultimate challenge, but their mastery proved no leaf or stem too prickly, smooth, shiny, or dull to replicate. Organic materials were applied to the surfaces of the models to reduce shine and mimic different textures. Many of the models’ fine details can be seen only by close inspection or through the lens of a microscope.

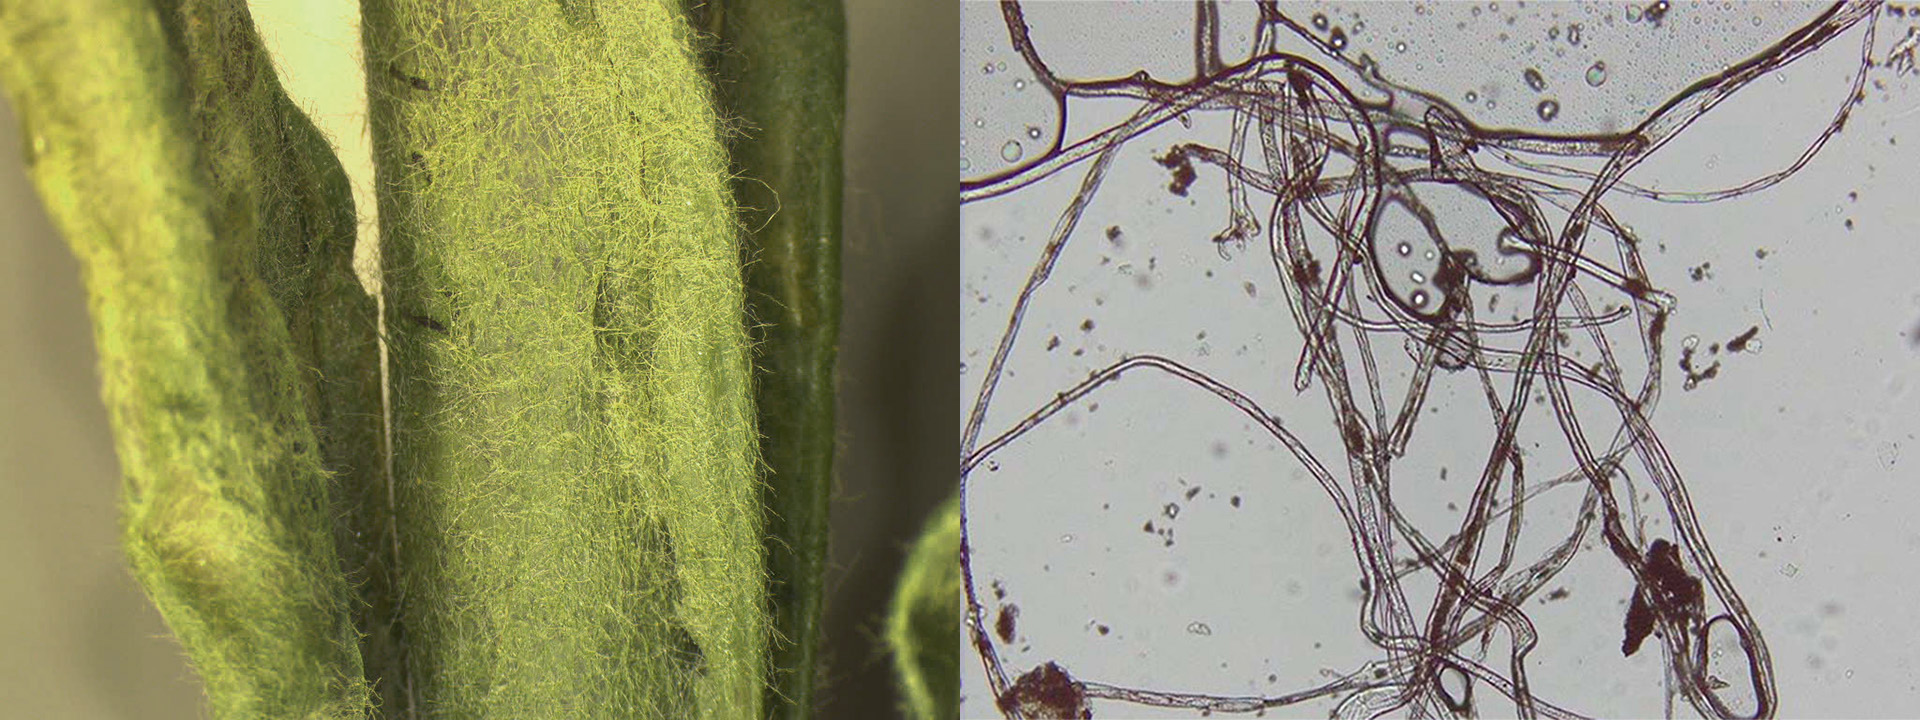
Hairy Surfaces
The “hairy” surfaces on the leaves of the Common Mullein, Verbascum thapsus, were made by blowing fine cotton fiber flocking onto the cooled glass surface, made tacky with animal glue. A polarized light microscope was used to identify the distinctive appearance of “cotton” as the fiber used.
Almost Invisible Details
Macrophotography revealed otherwise invisible details in the Common Goldstar bloom, Hypoxis hirsuta. Twisted stamens, paint flecks, and powdered yellow pigment add subtle texture to the center of the flowers.


Nature's Hues
The Blaschkas were equally skilled at replicating nature’s colors as they were at replicating nature’s textures. Their materials and methods for coloring the models changed over time.
Paint
The Blaschkas’ earliest models were cold-painted using glue-based distemper paints, applied to the models’ surface following a coating of animal glue. They were limited to the pigments commonly available in the nineteenth century. Some pigments, like reds and yellows, are particularly light-sensitive and tend to fade over time. Pigments currently identified include:


Colored Glass
After his father’s death in 1895, Rudolf Blaschka developed a process of using colored glass enamels instead of paints. His approach was to mix colored glass powders in a viscous medium, which he then brushed on the surface of the glass like a “paint.” When heated, the mixture would flow over the surface in overlapping layers of color. The results yielded stunningly lifelike hues nearly indistinguishable from a living plant, as seen here on the Red Maple, Acer rubrum, model.

Raw Materials
The Blaschkas used raw materials, including pigments and powdered glass, to color the models.

Caring for the Collection
Since the Blaschkas’ methodology evolved over time, the models can be roughly categorized according to the techniques used to create them. Early models were cold-painted. Models made during the Blaschkas’ most productive period from 1890–1895 show more refined details and complexity. After Leopold’s death in 1895, Rudolf created even more exceptional models, like the elaborate Oriental Planetree branch, Platanus orientalis, which was colored with glass enamels instead of paint.
The Blaschkas’ innovations and experimentation introduced unforeseen complications that require conservation treatment today. Conservation involves both preservation and restoration. Preservation includes preventive strategies like maintaining a stable environment to slow deterioration. Restoration involves treatments that return an object to a condition as close as possible to the original state. A conservation program is necessary to preserve, restore, and protect the Glass Flowers for many years to come.

Damage and Repair
The models are sensitive to temperature and humidity fluctuations because they are made from mixed materials that behave differently in changing environments. Damage can be prevented by carefully controlling the temperature, humidity, and light levels in the gallery and in storage.
Breakage
Breaks can be caused by external or internal forces or when the original animal glues lose their adhesive strength. Repairs are made using a stable and removable adhesive that will not break down or discolor over time.

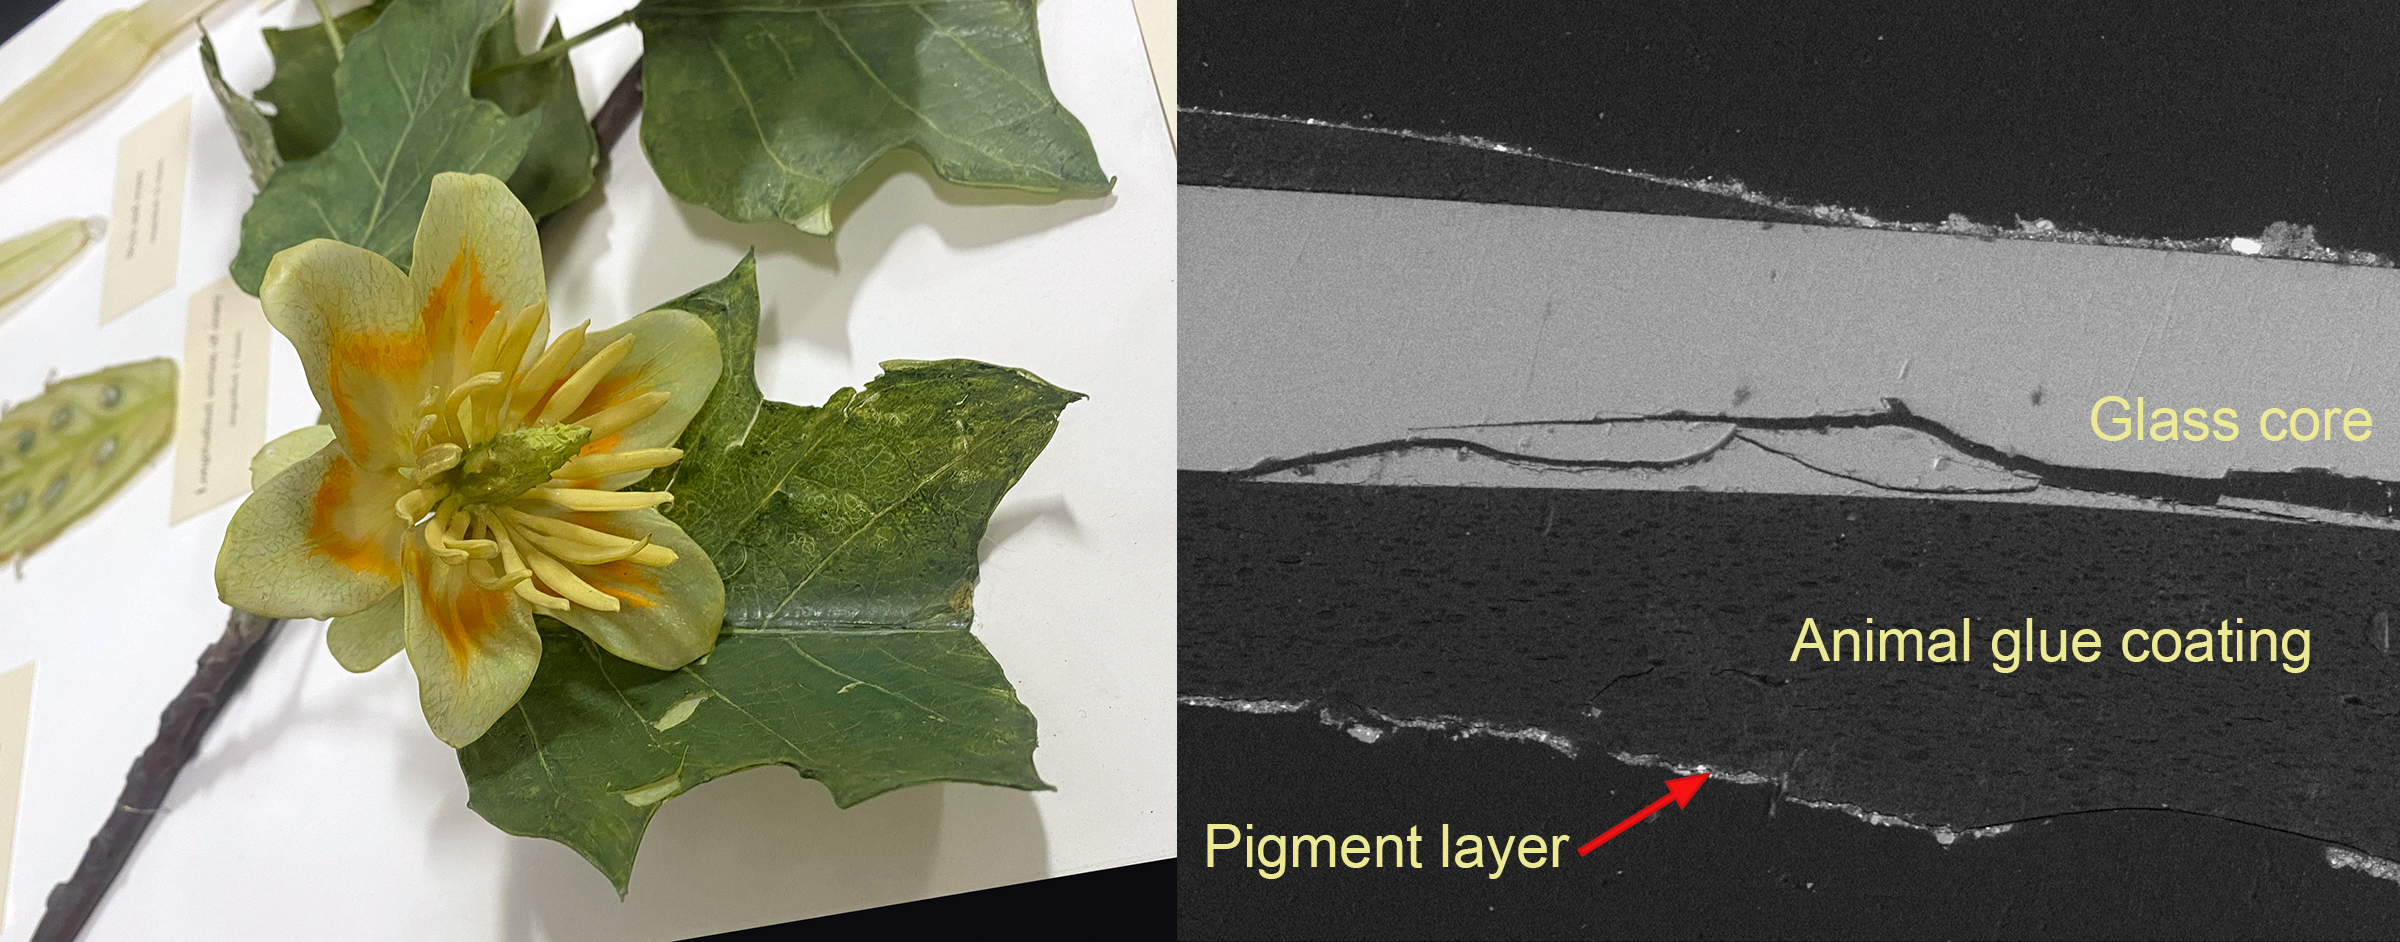
Internal Breakage
This microscope image shows the cross-section of a Tuliptree leaf, Liriodendron tulipifera, where the glass core suffered internal fractures, seen here as irregular horizontal lines in the light gray stripe. This was caused when organic coatings above and below the glass layer contracted in dry conditions and split the glass.
Bad Vibrations
In this image, external vibrations have caused the model’s parts to flex and move, resulting in the loss of glass. The exposed inner wire becomes vulnerable to corrosion and further damage. A common conservation treatment is to fill the gap with a stable adhesive matched in color to the surrounding area.

Old Repairs
Old repairs were made with unstable glues that can discolor over time, as seen on the leaves of this model. When possible, old glues are removed, and the model’s parts are reattached using an adhesive that is non-yellowing and reversible.

Cleaning
A variety of well-researched methods are used to carefully clean the models. A light brushing with a soft, dry artist’s brush will usually remove dust. Oily deposits of soot from old coal-burning heaters are removed with a mild solvent that will not damage water-soluble glues, pigments, and organic details on the models’ surfaces. Cotton swabs saturated with solvent were used to clean this magnified flower of oily soot.

Lifting Details
Fluctuations in temperature and humidity can cause details made from gelatin or animal glue to peel away from the glass, like the leaf veins in this image.

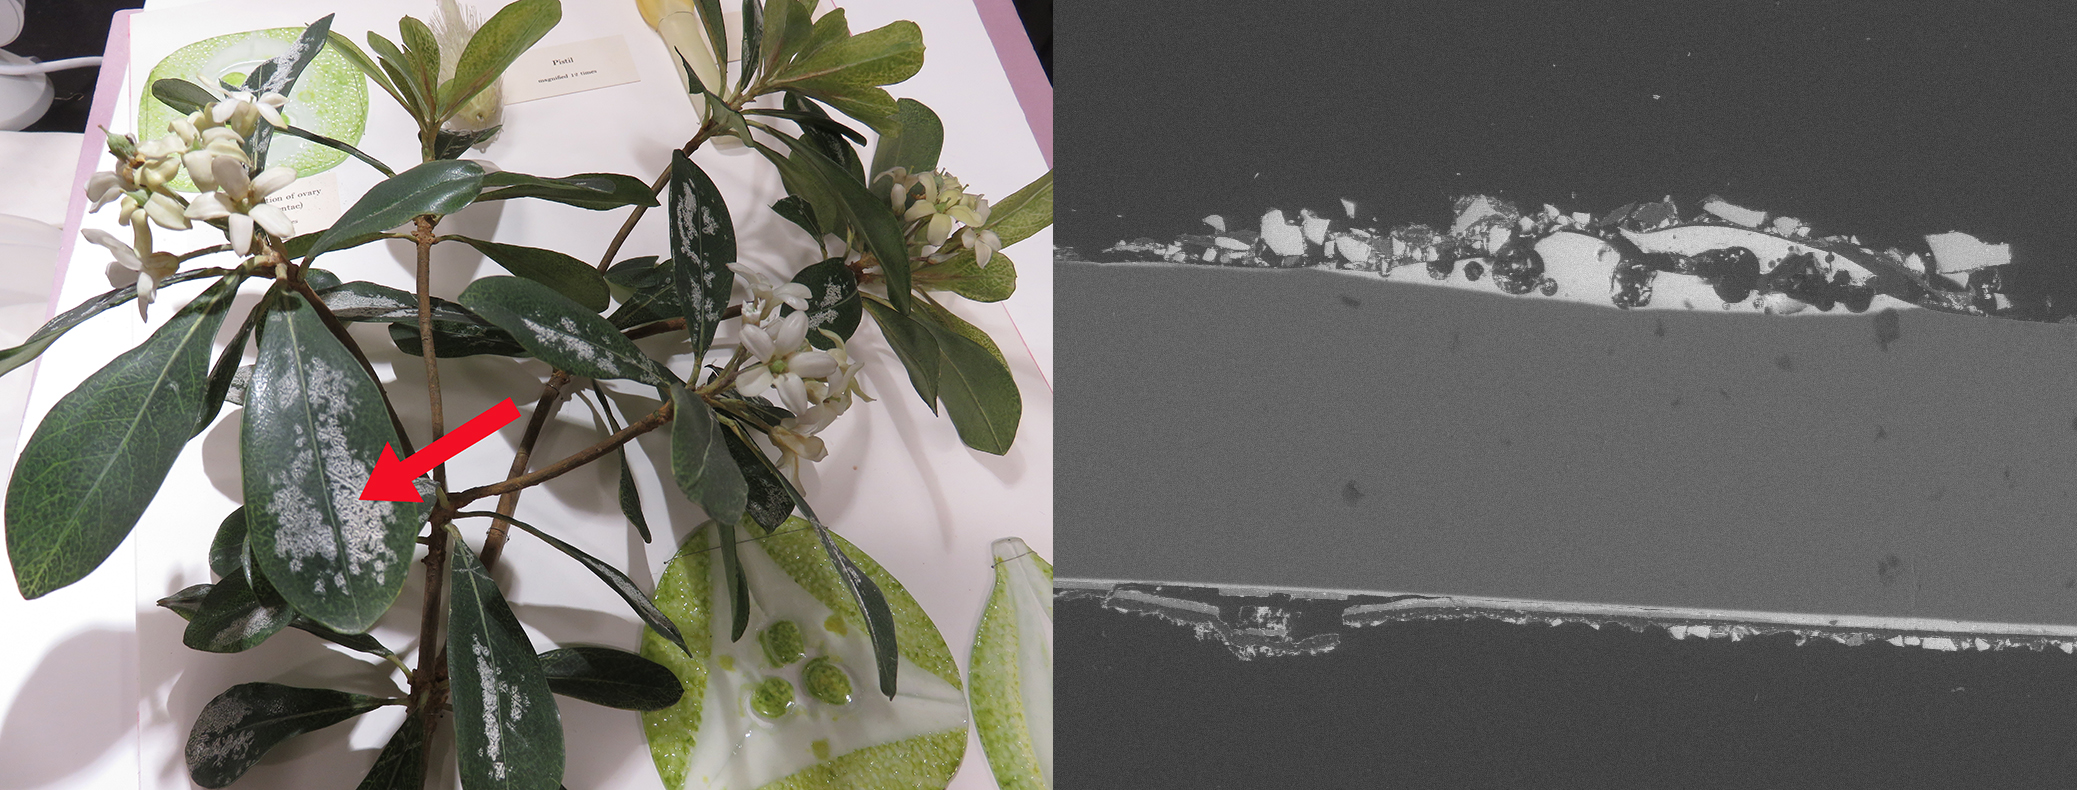
Chemistry of Deterioration
Rudolf Blaschka added lead to the glass enamels he used to color later models. This lowered the melting point of the glass enamels so they would melt without deforming the model parts that were being colored. This microscope image shows the cross-section of a leaf from the Japanese Cheesewood, Pittosporum tobria, that has lead salts on its surface, seen here as white particles. This efflorescence occurred when lead oxides in the glass were exposed to high humidity.
Color Shifting
Compare the color in this photo of a Cockspur Coral Tree, Erythrina crista-galli, with the glass model on the right. The original colors cannot be restored, but color shifting and fading can be minimized with controlled light levels in the gallery.

Research and Analysis
Drawing from the latest analytical tools available in the study of materials science, the conservator can pinpoint causes of deterioration on a microscopic level. Pigments and coatings can be identified and analyzed using instruments such as scanning electron microscopes.
Deciphering Materials
This photo of a leaf from the Dyebush, Psorothamnus emoryi, taken with a scanning electron microscope, reveals information about the materials used to create subtle variations in light reflectance and translucency in the model. The glass core is surrounded by white specks of talc additives, tin oxide, and zinc oxide, which give the leaves their matte finish.


Innovations in Conservation
The models deteriorate over time—their structures fail, glues weaken, and, in some cases, invisible cracks fracture the glass, causing damage and loss. These are often unique challenges for the conservator to address, requiring innovative conservation treatments. Here, the California Poppy, Eschscholzia californica, was missing a petal. It was replaced with a non-glass material to maintain the model’s scientific accuracy.
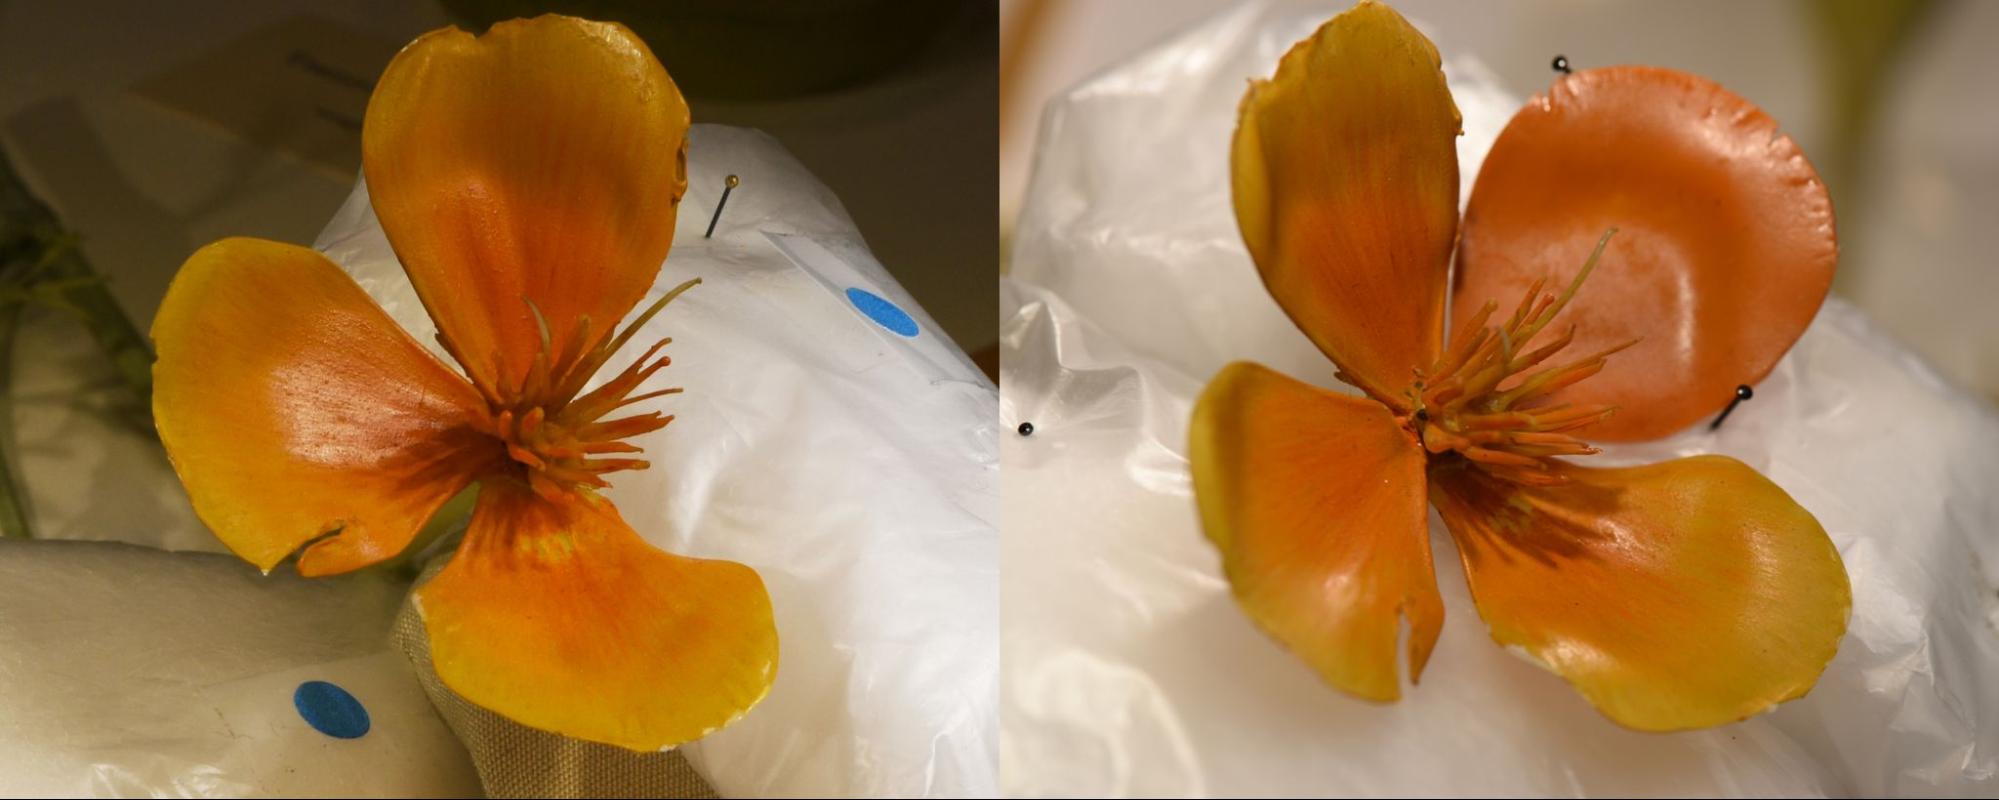
A clear acrylic resin, Paraloid B-72, was pigmented to match the color of the original petals. The liquid resin was poured into a mold to form a thin sheet. Once solidified, the sheet was softened with heat, and a new petal was cut out. The petal was further shaped by hand under warm air and attached to the model with the same liquid resin, which was used as an adhesive.

Preserving the Glass Flowers
Despite their delicate nature, the Blaschkas’ stunning glass models have endured for over a century. However, preserving these extraordinary works requires ongoing conservation efforts due to the ways their materials react to environmental changes. With dedication and proper care, we continue to learn how to best protect and conserve the Glass Flowers. Our commitment is to ensure these timeless creations can be studied, admired, and shared with visitors for many years to come, safeguarding their beauty and legacy for future generations.
